Photographing the Rafflesia tuan-mudae represents one of tropical photography’s greatest technical and logistical challenges. The world’s largest flower—sometimes exceeding one meter in diameter—sits at ground level in perpetually dim rainforest, displays extraordinary three-dimensional texture requiring precise focus control, and appears only during unpredictable blooming windows lasting approximately 5-10 days. Successfully capturing this botanical marvel demands specialized equipment, advanced technical knowledge, and creative problem-solving across multiple photographic disciplines. The following comprehensive guide synthesizes professional photography techniques tailored specifically to Rafflesia documentation at Gunung Gading National Park.
Understanding the Rafflesia Photography Challenge
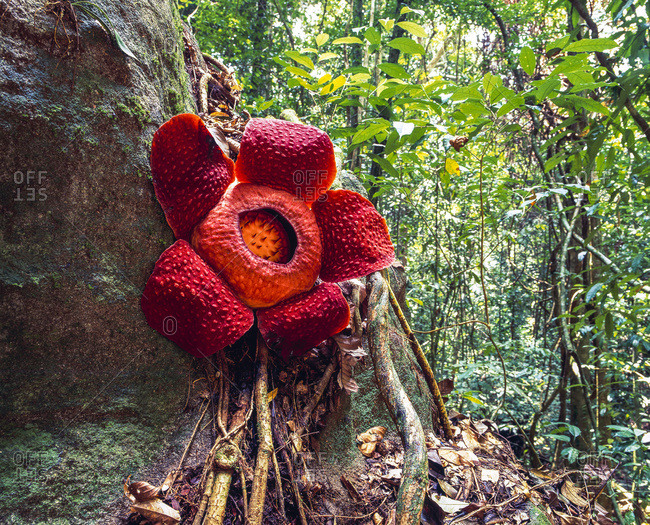
The Rafflesia presents a complex photographic puzzle because it violates most conventional flower photography assumptions. Traditional flower photography often employs bright, controlled lighting conditions in studio environments or open meadows bathed in natural sunlight. The Rafflesia exists within the opposite extreme: deep rainforest shade where direct sunlight rarely penetrates the dense canopy, creating illumination levels approximately 100-1000 times dimmer than open conditions. Additionally, the flower’s immense scale (typically 60-100 centimeters across, occasionally exceeding 110 centimeters) resists macro photography approaches designed for small subjects. The Rafflesia instead demands hybrid techniques combining landscape, environmental, and macro methodologies.
Professional photographer Nick Garbutt, who specializes in Rafflesia documentation, captured an 80-centimeter specimen on its third day of blooming using a Nikon D810, Nikon 8-15mm fisheye lens at 15mm focal length, f/10 aperture, 1/2 second shutter speed. This approach—employing an ultra-wide fisheye lens rather than macro optics—illustrates how Rafflesia’s extraordinary size demands alternative perspectives. The choice prioritized showing the flower within its rainforest context rather than magnifying microscopic details.
Equipment Selection
Camera Body Specifications
Modern digital cameras capable of high-ISO performance (ISO 3200-6400+) with minimal noise represent essential starting points. Full-frame DSLRs or mirrorless cameras significantly outperform cropped sensors when handling rainforest’s dim light. Contemporary camera systems including Canon EOS R5, Nikon Z8, and Sony A7 series maintain acceptable image quality even at extreme ISO values when combined with modern noise-reduction algorithms. The Canon EOS R5, for example, operates reliably in 85% humidity and 40°C temperatures while maintaining water resistance—critical durability characteristics for tropical environments.
Lens Selection
Counterintuitively, wide-angle lenses (8-24mm) often outperform macro lenses for Rafflesia documentation, because they permit ground-level positioning while capturing sufficient environmental context. The fisheye lens approach showcases the flower’s immense scale while incorporating surrounding rainforest, creating environmental portraiture rather than clinical magnification.
For photographers preferring alternative approaches:
Standard zoom lenses (16-35mm) offer versatility permitting multiple compositional perspectives without lens changes—a significant advantage in humid environments where changing lenses introduces condensation risk.
Macro lenses (90-105mm) enable detailed documentation of the flower’s intricate texture, petal structure, and distinctive white spots, though requiring comfortable positioning on muddy forest floors.
Telephoto lenses (70-200mm) allow distant positioning avoiding direct flower contact and provide compositional options through subject magnification and background compression.
Mastering Rainforest Lighting Conditions
Natural Light Strategy
Direct overhead sunlight in rainforests represents a serious technical problem, creating harsh shadows, blown highlights, and color distortion. Conversely, the golden hour concept—shooting during early morning or late afternoon when sunlight approaches at low angles—proves exceptionally valuable in rainforest contexts, providing directional illumination with flattering color temperature.
Early morning shooting (6:30-8:30 AM) provides multiple advantages: softer, directional sunlight filtering through canopy at oblique angles; reduced harsh shadows; superior color saturation; and optimal wildlife activity. Plan Rafflesia expeditions with 6:00-7:00 AM starts whenever possible.
Overcast and misty conditions, common during wet season months when Rafflesia blooms proliferate, paradoxically create ideal photography circumstances. Cloud cover acts as a natural diffuser, producing even illumination without harsh shadows. Embracing overcast conditions yields superior results compared to fighting harsh light.
Backlighting technique—positioning subjects so sunlight originates behind the flower—creates glowing silhouettes and minimizes harsh shadows on petals. This approach proves particularly effective when combined with supplementary fill-flash.
Flash Technique and Supplementation
Direct on-camera flash produces undesirable results: distracting highlights, ugly deep shadows, and inaccurate color rendering. However, judiciously applied flash can elevate images from mediocre to memorable, particularly as supplementary fill-light rather than primary illumination.
Professional approaches include:
Off-camera fill-flash: Position external flash units on either side of the subject with diffusers producing soft illumination that “lifts” shadow areas and enhances petal color saturation. Garbutt employed three synchronized flashes—one on each side and potentially one overhead—to achieve optimal illumination balance.
Flash exposure compensation: Adjust flash output (+2 to +3 stops typical for macro work) to balance with ambient rainforest light rather than overwhelming natural illumination.
Diffused flash: Always use diffusers softening harsh flash output. Direct flash remains counterproductive.
Hybrid ambient/flash exposure: Combine natural light (30-60% of total exposure) with supplementary flash (40-70% of exposure) creating natural-appearing images with enhanced detail and color.
Camera Settings for Technical Excellence
Aperture Strategy
The Rafflesia’s three-dimensional structure—petals curving from forest floor to 20+ centimeter height—presents extraordinary depth-of-field challenges. At f/2.8 aperture, only a paper-thin slice remains in focus. At f/16 aperture, diffraction softens details.
Optimal aperture selection depends on magnification and depth requirements:
Wide-angle environmental shots (f/5.6-f/8): Permits adequate depth of field capturing flower structure while maintaining crisp detail and retaining sufficient light for acceptable shutter speeds without requiring extreme ISO values.
Medium magnification documentary shots (f/8-f/11): Balances depth of field with diffraction-induced softness, representing ideal compromise for most Rafflesia documentation.
Macro close-ups of flower details (f/11-f/16): Maximizes depth of field for intricate petal texture and stamen structure documentation, with potential diffraction impact acceptable given macro magnification context.
Shutter Speed
Rainforest’s perpetual dimness necessitates careful shutter speed selection balancing motion blur risk against ISO elevation:
Handheld shooting: Minimum 1/125-1/250 second (depending on lens focal length and photographer steadiness) to avoid camera shake. Wide-angle lenses (15-35mm) require less stringent requirements than telephoto optics.
Tripod-mounted shooting: Enable 0.5-2 second exposures capitalizing on low-light conditions while maintaining sharp focus through stabilization.
High-speed sync flash: Enables 1/1000+ shutter speeds freezing any ambient light contribution while flash supplies primary illumination—useful technique when trying to isolate subject from murky background.
ISO Management
Modern cameras deliver acceptable results at ISO 2000-6400+, representing standard practice in rainforest photography. Embrace elevated ISO values—modern sensors and post-processing noise reduction handle high ISO excellently. Excessive ISO remains preferable to motion blur from inadequate shutter speed or severe underexposure.
Recommended starting point: ISO 2000-4000, adjusting upward or downward based on actual light conditions and desired aperture/shutter speed combination.
Focus and Depth of Field Techniques
Focus Stacking: The Professional Solution
When the Rafflesia’s dimensional depth exceeds available depth of field at acceptable apertures and shutter speeds, focus stacking—photographing multiple images focused at different distances and blending them computationally—produces final images with complete front-to-back sharpness.
Focus Stacking Workflow:
- Mount camera on sturdy tripod with stable positioning on uneven forest floor (extend legs unevenly as necessary to achieve level positioning)
- Enable manual focus mode and disable autofocus to maintain precise focus control
- Position initial focus point at foreground flower detail (petal fronts, closest spots)
- Photograph first exposure using appropriate aperture (typically f/8-f/11) and shutter speed
- Increment focus point rearward using manual focus ring or camera’s focus-shift feature
- Photograph subsequent exposures at each focal plane increment—typically 5-15 images depending on subject depth and magnification level
- In post-processing, employ Photoshop, Lightroom, or dedicated focus stacking software (Helicon Focus, Zerene Stacker) to blend exposures, retaining sharp regions from each image
Focus stacking delivers exceptional results for Rafflesia documentation, enabling complete petal sharpness while isolating subjects from murky rainforest backgrounds through selective depth of field control.
Manual Focus Precision
Enable manual focus rather than relying on autofocus, particularly in dim rainforest conditions where camera autofocus mechanisms struggle. Modern autofocus reliability has improved, but manual focus provides greater precision and predictability in challenging lighting.
Composition and Perspective Techniques
Ground-Level Positioning
The Rafflesia sits at forest floor level, necessitating that photographers position themselves crouched, kneeling, or lying on muddy forest ground to capture eye-level perspectives. This uncomfortable positioning delivers superior compositional results compared to awkward above-the-flower angles. Accept inevitable mud stains as badges of authentic field photography.
Environmental Context
Rather than isolating the flower as a disconnected object, incorporate rainforest context communicating the Rafflesia’s ecological niche: scattered leaves, moss, organic forest debris, surrounding Tetrastigma host vines. This environmental approach educates viewers about the flower’s specific habitat requirements and parasitic nature, adding documentary value to aesthetic imagery.
The Rule of Thirds
Position the Rafflesia’s center at one of the four rule-of-thirds intersection points rather than centered in frame, creating more dynamic, engaging compositions. Leave compositional space where the flower “faces” within the frame rather than cramming it into the image center.
Leading Lines
Incorporate forest elements—vine directions, leaf arrangements, stream flow—that guide viewer attention toward the flower. Natural leading lines enhance compositional flow.
Depth Communication
Employ foreground/middle-ground/background layering through thoughtful positioning and focus stacking. Include slightly out-of-focus forest elements in foreground, sharp flower in middle-ground, blurred background canopy—this stratification communicates depth and three-dimensionality.
Variety in Scale and Perspective
Photograph the Rafflesia from multiple perspectives: wide environmental shots showing the flower within entire forest context, medium shots including surrounding immediate habitat, macro close-ups documenting petal texture and detail. This multi-scale documentation approach creates comprehensive visual records.
Humidity, Condensation, and Equipment Protection
The Condensation Challenge
Rainforests create perpetual condensation risk as warm, moisture-saturated air contacts cooler camera equipment. Condensation on sensor or internal optics produces permanent fog across every image—a catastrophic field failure requiring professional cleaning.
Condensation Prevention Strategy:
- Allow equipment to acclimate gradually before transitions between air-conditioned spaces and humid rainforest. Permit 30-60 minutes minimum acclimation time.
- Use sealed plastic bags during transitions from cool to hot environments. Place camera inside sealed ziplock bag while still in air-conditioned hotel room, seal, then gradually allow temperature equilibration outside before opening.
- Minimize lens changes in field conditions. Select required lenses before departing hotel, then avoid changing lenses until returning to controlled environment.
- Always attach rear lens cap before removing a lens from the camera body, and attach front lens cap immediately upon removing lens to prevent moisture ingress.
- Carry silica gel packets and dry boxes maintaining equipment in low-moisture microenvironments during field breaks.
- Clean lenses frequently with microfiber cloths, particularly when transitioning between wet and dry conditions.
Equipment Sealing for Extreme Humidity
Store valuable lenses in small sealed containers with fresh silica gel between shooting sessions. Replace silica gel packets every 2-3 hours or immediately after extended wet conditions. A simple Tupperware container or waterproof case with silica gel packets maintains dry microclimate for delicate optics.
Practical Rafflesia Photography Workflow
Pre-Shoot Preparation
- Contact park (Tel: +60-82-735144) minimum 1-2 weeks prior confirming recent bloom activity
- Pack redundant equipment: Additional battery, memory cards, backup lens, spare tripod
- Prepare tripod for muddy conditions: Ensure spiked feet can dig into soft forest soil. Bring sandbag or weights for wind-prone situations
- Gather moisture protection: Silica gel packets, dry bags, lens cleaning cloths
- Select lenses before field departure: Avoid in-field lens changes
Field Photography Protocol
- Arrive at trailhead by 6:00-7:00 AM to maximize morning light quality and reach Rafflesia before crowds
- Begin with wide environmental shots (fisheye or wide-angle, f/5.6-f/8) establishing context
- Progress to medium detail shots (standard zoom, f/8-f/11) documenting flower structure
- Conclude with focus-stacked macro series (f/8-f/11, 5-15 exposures) if time and equipment permits
- Photograph from multiple angles and heights capturing diverse perspectives
- Monitor gear for condensation during extended field sessions, wiping lenses/viewfinder regularly
- Document metadata: Note bloom day (day 1-10 of lifespan), weather conditions, time of day, resulting color saturation variations
Post-Processing Strategies
RAW Workflow Foundation
Photograph exclusively in RAW format (not JPEG) to maximize post-processing flexibility. RAW files contain vastly more tonal data enabling sophisticated adjustments without degradation.
Highlight and Shadow Management
- Check highlights and shadows during initial RAW processing, ensuring petal details aren’t blown out to pure white or crushed to black
- Recover blown highlight detail using dedicated highlight recovery sliders in Lightroom/Camera Raw
- Bring up shadow details moderately, balancing visibility against noise introduction at elevated ISO
- Preserve dynamic range rather than extreme contrast adjustments
Color Temperature and White Balance
Rainforest lighting contains unusual color casts—excess green (from surrounding foliage), cooler blue tones (from shaded conditions), variable color temperature between shadowed and dappled-sun regions. Establish accurate white balance by:
- Using custom white balance during shooting, photographing a neutral gray card in Rafflesia lighting conditions, then setting camera to this reference
- In post-processing, examine color temperature sliders, shifting toward warm tones if excessively blue, or reducing warm cast if overly yellow-green
- The Rafflesia’s reddish petals should display vibrant red coloration, not muted brick-red suggesting color cast problems
Saturation and Vibrancy Adjustment
The Rafflesia’s brilliant red and white coloration tempts aggressive color enhancement. Exercise restraint:
- Increase vibrancy moderately (+5 to +15) rather than saturation, which tends toward unnatural cartoonish appearance
- Isolate petal color adjustment using masking tools, enhancing red/magenta hues without affecting background foliage
- Reduce distracting background saturation, particularly if forest green dominates portions of image, ensuring flower commands primary viewer attention
- Avoid HDR processing and extreme local contrast enhancement producing artificial, posterized appearance incompatible with natural flower documentation
Contrast and Clarity Enhancement
- Increase overall contrast moderately (+5 to +20) emphasizing petal texture and detail
- Apply clarity selectively to enhance texture without creating harsh artifacts, particularly on petals where midtone contrast enhancement showcases ribbed petal structure
- Reduce clarity in background to create separation between sharp flower and softer rainforest context
Noise Reduction and Sharpening
- Apply noise reduction appropriate to ISO level used during shooting. Higher ISO necessitates more aggressive luminance noise reduction while maintaining modest chrominance noise reduction to avoid color artifacts
- Apply moderate sharpening (radius 0.5-1.0, amount 80-150) to petal texture. Avoid excessive sharpening producing halos
- Sharpen selectively using masking to enhance flower detail while avoiding background noise amplification
Cropping and Composition Refinement
- Review composition using rule-of-thirds overlay grid. Adjust crop to position Rafflesia at intersection point rather than image center
- Remove distracting elements (intrusive leaves, cluttered background details) through thoughtful cropping
- Maintain environmental context rather than over-cropping to pure flower isolation
Weather and Seasonal Considerations
Wet Season Advantages
The November-February wet season, when Rafflesia blooms proliferate, brings frequent rain and persistent cloud cover. Rather than viewing this as photographic impediment:
- Embrace overcast conditions producing even, shadowless illumination ideal for flower documentation
- Photograph during and immediately after rainfall capturing water droplets on petals adding visual interest
- Understand that dry season (May-September) with bright sunlight typically produces inferior Rafflesia photographs compared to wet season’s diffused light
Time-of-Day Strategy
- Early morning (6:30-8:30 AM): Softly directional sunlight, fewer crowds, optimal wildlife activity
- Mid-morning (9:00-11:00 AM): More overhead canopy light, continued acceptable conditions
- Midday (11:00 AM-3:00 PM): Harsh, direct overhead light creates unflattering shadows and color distortion—minimize shooting during these hours if possible
- Late afternoon (4:00-5:30 PM): Golden-hour approach sun angle returns, producing warm illumination. However, diminishing daylight reduces overall light levels significantly
Working with Park Guides and Logistics
Guide Collaboration
Official park guides significantly enhance photography success by:
- Locating active blooms within the sprawling park
- Providing contextual botanical knowledge explaining flower biology, enabling informed caption writing
- Suggesting optimal camera angles based on guide’s familiarity with specific flowers’ orientations and surrounding vegetation
Allocate RM 30-50 for professional guide services (negotiate rates at Park HQ) as investment in superior photographic results and educational value.
Realistic Expectations and Backup Plans
Despite comprehensive preparation, Rafflesia bloom sightings remain never guaranteed. Visiting during bloom periods increases probability but doesn’t guarantee success. Develop backup photographic objectives:
- Document young Rafflesia buds in various growth stages along the Rafflesia Trail plankwalk, producing educational series even without mature blooms
- Photograph rainforest biodiversity: fungi, insects, small creatures, forest scenery
- Capture waterfall and stream landscapes providing visually compelling content independent of Rafflesia presence
- Document forest ecology and structure: canopy layers, forest floor detail, sunlight filtering through leaves
The Rafflesia photography experience succeeds not only through bloom documentation but through authentic rainforest engagement and comprehensive natural history documentation across multiple subjects and photographic disciplines.